- Prerequisites
- Getting Started
- Development Workflow
- Common Tasks
- Linking with the developer build of tsurlfilter/tswebextension
- Linking tsurlfilter on CI (Bamboo)
- Building the beta and release versions
- Special building instructions for Firefox reviewers
- Analyzing bundle size
- Debug MV3 declarative rules
- Hotfix filters for MV3 with skip review
- Update localizations
- Bundle Size Monitoring
- Project Architecture
- Environment Variables
- Troubleshooting
- Additional Resources
Ensure that the following software is installed on your computer:
- Node.js: v22 (you can install multiple versions using nvm)
- pnpm: v10
- Git
- Docker (optional, for CI-like builds and Firefox reviewer builds)
-
Clone the repository:
git clone https://github.com/AdguardTeam/AdguardBrowserExtension.git cd AdguardBrowserExtension -
Install dependencies:
pnpm install
-
(Optional) Copy and configure environment variables:
cp .env.example .env
See Environment Variables for details.
-
Build the extension for a specific browser:
pnpm dev chrome
-
Load the unpacked extension into your browser from
./build/dev/chrome. See How to install the unpacked extension for step-by-step instructions.
| Command | Description |
|---|---|
pnpm dev [browser] |
Development build (all browsers if none specified) |
pnpm dev <browser> --watch |
Development build with file watching |
pnpm beta [browser] |
Beta build |
pnpm release [browser] |
Release build |
pnpm test |
Run all unit tests (MV2 + MV3) |
pnpm test:mv2 |
Run MV2 unit tests only |
pnpm test:mv3 |
Run MV3 unit tests only |
pnpm test:integration <target> |
Run integration tests |
pnpm lint |
Run all linters (ESLint + TypeScript) |
pnpm lint:code |
Run ESLint only |
pnpm lint:types |
Run TypeScript type checking (MV2 + MV3) |
pnpm lint:types:mv2 |
TypeScript type checking for MV2 |
pnpm lint:types:mv3 |
TypeScript type checking for MV3 |
pnpm resources |
Download filters and public suffix list |
pnpm resources:mv3 |
Download resources for MV3 (includes DNR rulesets) |
pnpm locales <command> |
Manage localizations (see Update localizations) |
pnpm check-bundle-size <env> [browser] |
Check bundle sizes against limits |
pnpm update-bundle-size <env> [browser] |
Update bundle size reference values |
Supported <browser> values: chrome, chrome-mv3, edge, opera, opera-mv3, firefox-amo, firefox-standalone.
Unit tests use Vitest with separate projects for MV2 and MV3:
pnpm testRun tests matching a specific pattern:
pnpm test <pattern>Integration tests require a built extension:
pnpm test:integration <TARGET>
# TARGET can be 'dev', 'beta', 'release', same as build targets.
Integration tests with userscripts mode selection:
pnpm test:integration <TARGET> [-u <USERSCRIPTS_MODE>]
# TARGET can be 'dev', 'beta', 'release', same as build targets.
# USERSCRIPTS_MODE can be 'enabled' or 'disabled' (default: both modes)
Integration tests with debug mode (page will be stopped after tests execution) for one of them:
pnpm test:integration <TARGET> [-d|--debug-test-id <TEST_ID>] [-u <USERSCRIPTS_MODE>]
# TARGET can be 'dev', 'beta', 'release', same as build targets.
# TEST_ID can be extracted from https://testcases.agrd.dev/data.json
# USERSCRIPTS_MODE can be 'enabled' or 'disabled' (default: both modes)The project uses ESLint with the Airbnb TypeScript configuration and strict TypeScript type checking.
Run all linters:
pnpm lintRun ESLint only:
pnpm lint:codeRun TypeScript type checking:
pnpm lint:types        # Both MV2 and MV3
pnpm lint:types:mv2    # MV2 only
pnpm lint:types:mv3    # MV3 only
Pre-commit hooks (via Husky and lint-staged) automatically lint staged files.
Note
Before submitting a pull request, always run pnpm lint and pnpm test to verify
all checks pass. See the review checklist in AGENTS.md for the full
pre-submission checklist.
Build the dev version for all browsers:
pnpm devThis will create a build directory with unpacked extensions for all browsers:
build/dev/chrome
build/dev/edge
build/dev/firefox-amo
build/dev/firefox-standalone
build/dev/opera
build/dev/opera-mv3
Build for a specific browser:
pnpm dev <browser>Where <browser> is one of: chrome, chrome-mv3, edge, opera, opera-mv3, firefox-amo,
firefox-standalone. For example:
pnpm dev chromeRun the dev build in watch mode to automatically rebuild on file changes:
pnpm dev --watchOr for a specific browser:
pnpm dev <browser> --watchSince version v4.0, AdGuard browser extension uses an open source library tsurlfilter that implements the filtering engine.
While developing the browser extension it may be required to test the changes
to tsurlfilter. Here's what you need to do to link your local dev build
to the local dev build of tsurlfilter.
-
Clone and build tsurlfilter libraries.
-
You have two options to link the packages:
-
Option 1: Link the packages globally:
-
Go to the
tsurlfilter/packages/tsurlfilterortsurlfilter/packages/tswebextensiondirectory. -
Run the following command:
pnpm link --global
This command will create a symlink to the package in the global
node_modulesdirectory. -
Once you have the packages linked globally, you can link them to the browser extension. Just run the following command in the root directory of the browser extension:
pnpm link @adguard/tsurlfilter
-
-
Option 2: Link the packages by path:
-
Just run the following command in the root directory of the browser extension:
pnpm link <path-to-tsurlfilter/packages/tsurlfilter>
-
-
-
If you want to unlink the packages, just run
pnpm unlink @adguard/tsurlfilterorpnpm unlink @adguard/tswebextensionin the root directory of the browser extension regardless of the linking option you chose.[!WARNING] pnpm will modify the lock file when linking packages. See pnpm/pnpm#4219.
[!NOTE] If you want to list linked packages, run
pnpm list --depth 0in the root directory of the browser extension which will show you all dependencies. Linked packages have a version likelink:../path/to/package. -
Build the browser extension in the watch mode:
pnpm dev <browser> --watch --no-cache
--no-cacheflag is required to rebuild the extension on changes in the linked packages.
CI builds use Docker multi-stage builds defined in Dockerfile. The tsurlfilter linking process is split into two phases:
- Clone phase (
clone-tsurlfilter.sh) - Clones tsurlfilter repository on CI (~3 seconds) - Build phase (inside Docker) - Builds tsurlfilter packages (~70 seconds, cached by Docker)
- Link phase (
link-tsurlfilter.sh) - Links pre-built packages to the browser extension (~2-3 seconds)
To link with a specific tsurlfilter commit, branch, or tag, edit the configuration in bamboo-specs/scripts/clone-tsurlfilter.sh:
# Set TSURLFILTER_REF to the desired reference
# TSURLFILTER_REF="fix/AG-45315"     # branch name
# TSURLFILTER_REF="a1b2c3d4e5f6..."  # commit hash
# TSURLFILTER_REF="v2.1.0"           # tag name
# TSURLFILTER_REF="" # skip cloning/building/linkingThe build process uses Docker named build contexts for efficient caching:
-
Clone on CI -
clone-tsurlfilter.shclones tsurlfilter to a sibling directory (../tsurlfilter). This happens outside Docker, so no SSH keys are needed inside the container. -
tsurlfilter-buildstage - Receives the cloned source via--build-context tsurlfilter=../tsurlfilter. Docker automatically checksums the content and caches the build (~70 seconds). Cache invalidates only when tsurlfilter source changes. -
linked-depsstage - Combines the browser extension dependencies with pre-built tsurlfilter packages. Runslink-tsurlfilter.shto create pnpm links. -
Build/test stages - All CI jobs (lint, unit tests, integration tests, builds) inherit from
linked-depsand share the same cached dependencies.
Note
The tsurlfilter build stage is cached by Docker based on source content checksum. Rebuilds occur automatically when any file in the tsurlfilter repository changes.
You can run the same CI tests locally using Docker:
# First, clone tsurlfilter to sibling directory
./bamboo-specs/scripts/clone-tsurlfilter.sh

# Run unit tests
docker build -f Dockerfile --build-context tsurlfilter=../tsurlfilter --target unit-tests-output --output type=local,dest=output .

# Run linter
docker build -f Dockerfile --build-context tsurlfilter=../tsurlfilter --target lint-output --output type=local,dest=output .

# Build dev artifacts
docker build -f Dockerfile --build-context tsurlfilter=../tsurlfilter --target dev-build-output --output type=local,dest=output .
Tip
Pass --build-arg TEST_RUN_ID=$(date +%s) to bust the cache and force a fresh run.
Before building the release version, you should manually download the necessary resources that will be included into the build: filters and public suffix list.
pnpm resourcesTip
Run pnpm resources:mv3 to download resources for MV3 version.
The pnpm resources command performs the following steps:
- Downloads filters: Fetches filter metadata and filter rules from the AdGuard filters repository
- Updates local script rules: Extract script rules inside separate file only for firefox.
- Finds dangerous rules (optional): If
OPENAI_API_KEYenvironment variable is provided, uses OpenAI API to analyze and identify potentially dangerous rules in the filters
For MV3 version (pnpm resources:mv3), the process includes additional steps:
- Updates dnr-rulesets package: Installs the latest
@adguard/dnr-rulesetspackage - Updates local test script rules: Fetches all script rules from test cases and updates local resources
- Downloads and prepares MV3 filters: Downloads filters and converts them to declarative format
- Updates local resources for MV3: Processes and updates local script resources for Chromium MV3
- Finds dangerous rules (optional): If
OPENAI_API_KEYenvironment variable is provided, uses OpenAI API to analyze and identify potentially dangerous rules in the filters - Extracts unsafe rules: Runs a separate command to identify and extract unsafe rules to ruleset metadata
See dangerous rules documentation for more details about the dangerous rules detection process.
pnpm beta
pnpm release
You will need to put certificate.pem file to the ./private/AdguardBrowserExtension directory. This
build will create unpacked extensions and then pack them (crx for Chrome).
For testing purposes for dev command credentials taken from ./tests/certificate-test.pem file.
WARNING: DO NOT USE TEST CREDENTIALS FOR PRODUCTION BUILDS, BECAUSE THEY ARE AVAILABLE IN PUBLIC.
You can use Crx CLI keygen
to generate credentials for crx builds, see the example below:
# Command will generate `key.pem` credential in the `./private/AdguardBrowserExtension` directory
pnpm crx keygen ./private/AdguardBrowserExtension-
To ensure that the extension is built in the same way, use the docker image:
docker run --rm -it \ -v "$(pwd)":/workspace \ -w /workspace \ adguard/extension-builder:22.17--0.4.1--0 \ /bin/bash -
Inside the docker container, install the dependencies:
pnpm install
-
To build the BETA version, run:
pnpm beta firefox-standalone
-
Navigate to the build directory:
cd ./build/beta -
Compare the generated
firefox-standalone.zipfile with the uploaded one.
If you need to build the RELEASE version:
-
Run:
pnpm release firefox-amo
-
Navigate to the build directory:
cd ./build/release -
Compare the generated
firefox-amo.zipfile with the uploaded one.
If you want to analyze the bundle size, run build with the ANALYZE environment:
pnpm cross-env ANALYZE=true pnpm <build command>So, for example, if you want to analyze the beta build for Chrome, run:
pnpm cross-env ANALYZE=true pnpm beta chromeOr if you want to analyze all beta builds, run:
pnpm cross-env ANALYZE=true pnpm betaAnalyzer will generate reports to the ./build/analyze-reports directory in the following format:
build/analyze-reports
├── <browser-name>-<build-type>.htmlIf you want to debug MV3 declarative rules and check exactly which rules have been applied to requests, you can build and install the extension as described in the sections below. This will allow you to view the applied declarative rules in the filtering log.
Additionally, you can edit filters and rebuild DNR rulesets without rebuilding the entire extension, which may be useful for debugging purposes.
-
Ensure that you have installed all dependencies as described in the Prerequisites section.
pnpm install
-
Run the following command in the terminal:
pnpm dev chrome-mv3 # OR: opera-mv3 -
The built extension will be located in the following directory:
./build/dev/chrome-mv3 # OR: opera-mv3
-
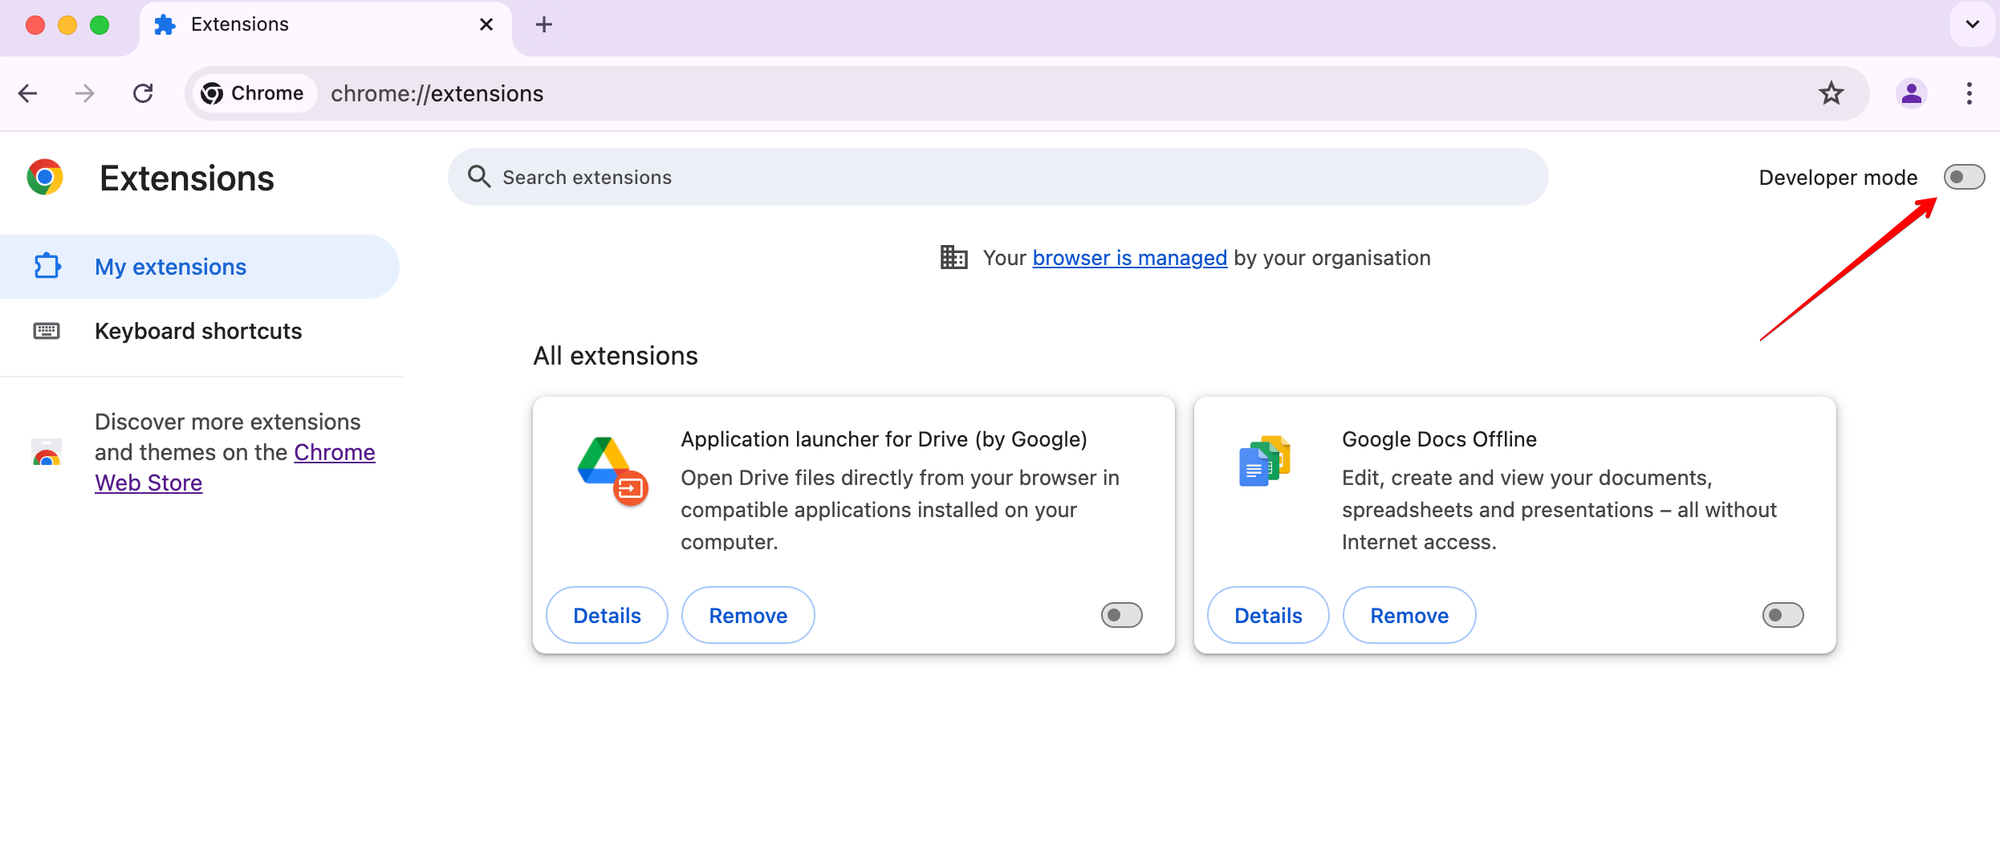
Turn on developer mode:
-
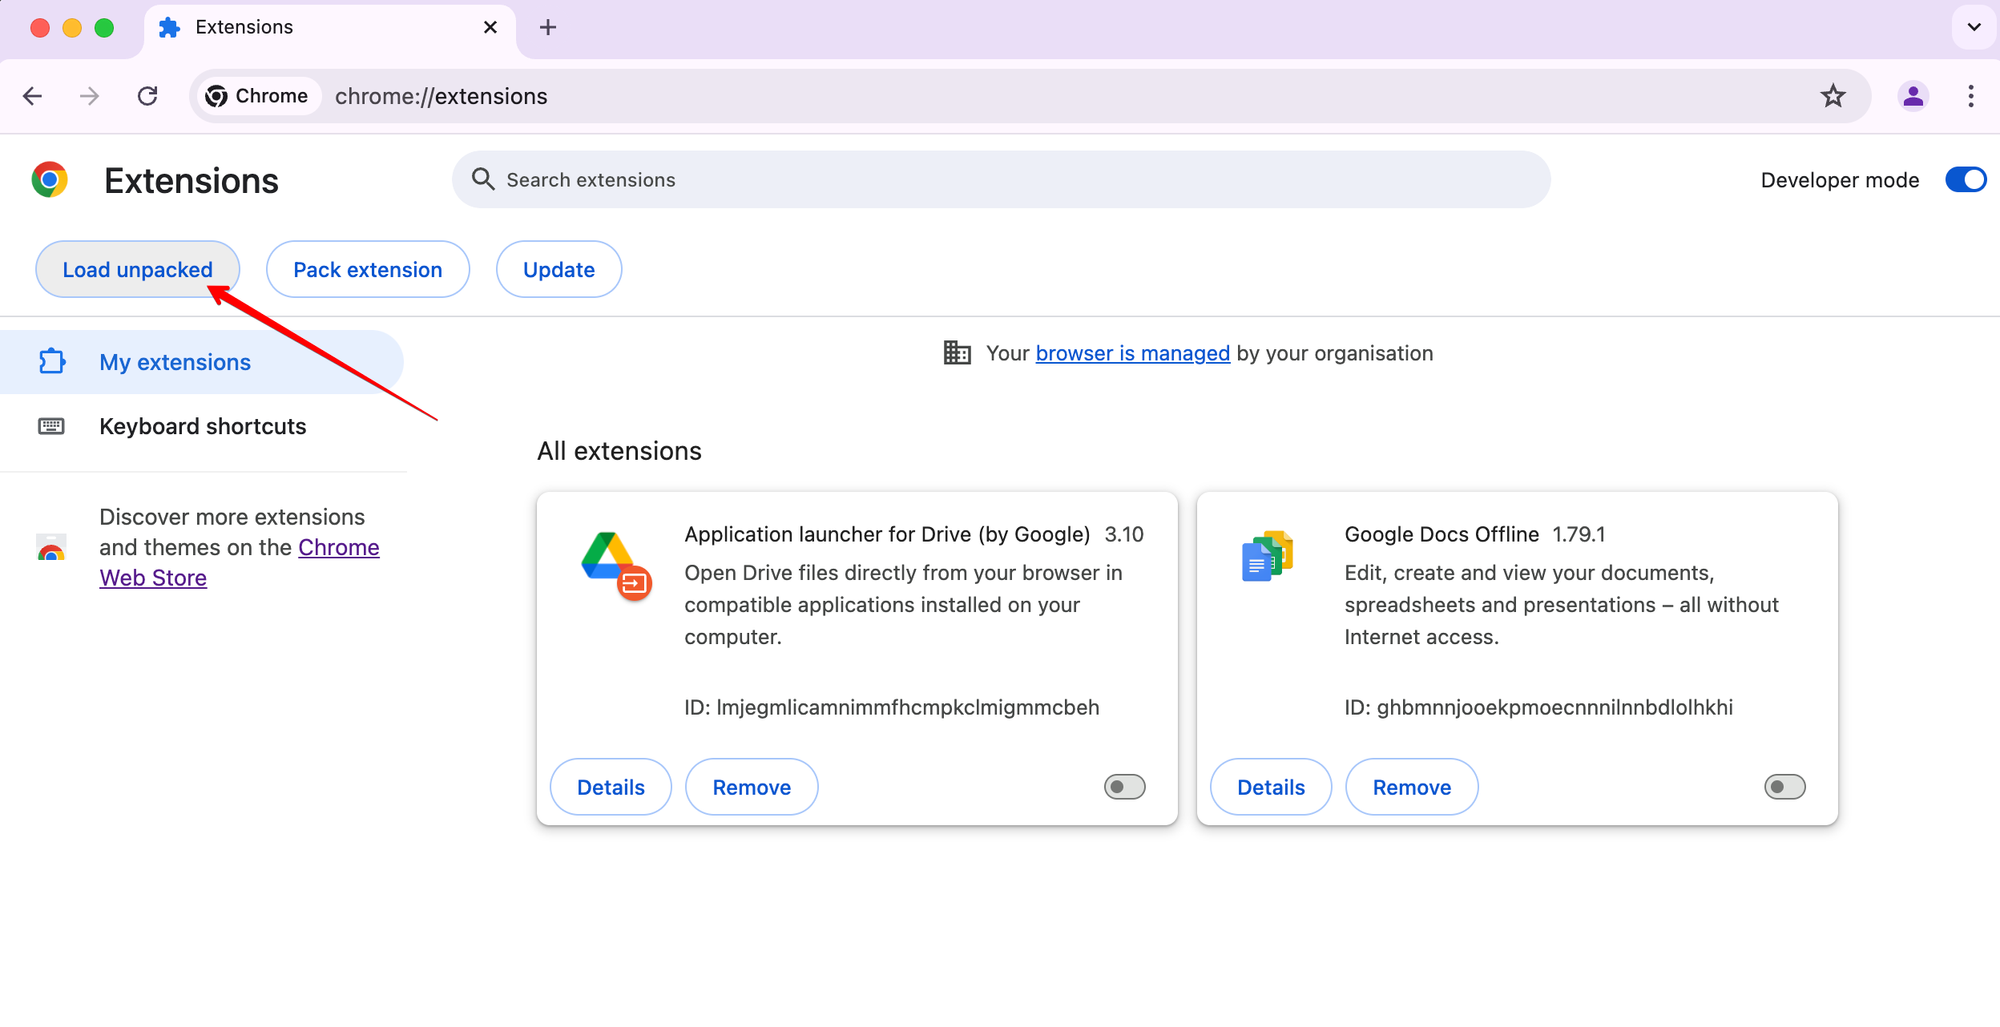
Click Load unpacked:
-
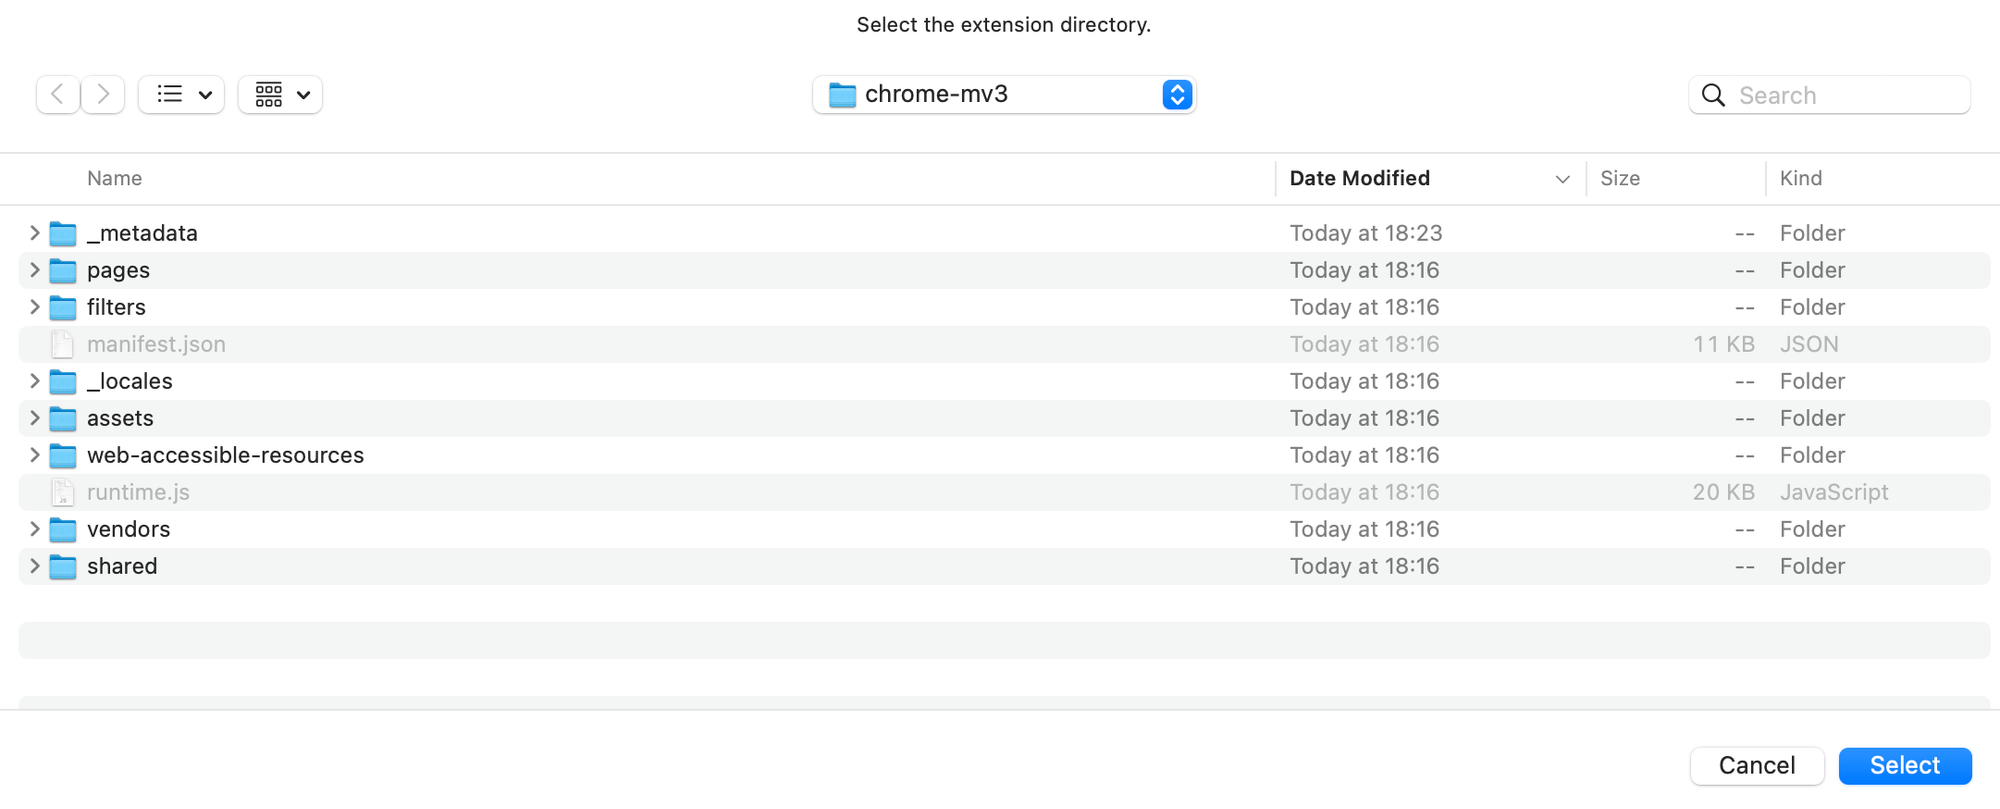
Select the extension directory and click
Select:
You can debug and update DNR rulesets without rebuilding the entire extension. There are two main workflows:
A. Automatic (recommended for most cases):
-
Build the extension (if not done yet):
pnpm install pnpm dev chrome-mv3 # OR: opera-mv3 -
Start watching for filter changes:
pnpm debug-filters:watch
- This command has
-b, --browser <browser>option to specify the browser target. Available browsers:chrome-mv3,opera-mv3. Default:chrome-mv3. - This will extract text filters to
./build/dev/<browser>/filtersand watch for changes. - When you edit and save any filter file, DNR rulesets will be rebuilt automatically.
- This command has
-
Reload the extension in your browser to apply new rulesets.
B. Manual (for advanced/manual control):
-
Build the extension (if not done yet):
pnpm install pnpm dev chrome-mv3 # OR: opera-mv3 -
Extract text filters:
pnpm debug-filters:extract
- This command has
-b, --browser <browser>option to specify the browser target. Available browsers:chrome-mv3,opera-mv3. Default:chrome-mv3.
- This command has
-
Edit the text filters in
./build/dev/<browser>/filtersas needed. -
Convert filters to DNR rulesets:
pnpm debug-filters:convert
- This command has
-b, --browser <browser>option to specify the browser target. Available browsers:chrome-mv3,opera-mv3. Default:chrome-mv3.
- This command has
-
Reload the extension in your browser to apply new rulesets.
Tip
To download the latest available text filters, run:
pnpm debug-filters:load- This command has
-b, --browser <browser>option to specify the browser target. Available browsers:chrome-mv3,opera-mv3. Default:chrome-mv3.
If you see an exclamation mark in the filtering log, it means the assumed rule (calculated by the engine) and the applied rule (converted to DNR) are different. Otherwise, only the applied rule (in DNR and text ways) will be shown.
-
Watch for changes and auto-convert:
pnpm debug-filters:watch
# Under the hood:
pnpm exec dnr-rulesets watch \
    # Enable extended logging about rulesets, since it is optional - it can be removed
    --debug \
    # Path to the extension manifest
    # Where <browser> is the browser target, can be 'chrome-mv3', 'opera-mv3'
    ./build/dev/<browser>/manifest.json \
    # Path to web-accessible-resources directory (needed for $redirect rules)
    # relative to the root directory of the extension (because they will be
    # loaded during runtime).
    /web-accessible-resources/redirects
-
Load latest text filters and metadata:
pnpm debug-filters:load
# Under the hood:
pnpm exec dnr-rulesets load \
    # This will load latest text filters with their metadata
    --latest-filters \
    # Browser target, can be 'chromium-mv3', 'opera-mv3'
    # Note: `chrome-mv3` is automatically converted to `chromium-mv3`
    # when you run `pnpm debug-filters:load chrome-mv3` command.
    --browser <browser> \
    # Destination path for text filters
    # Where <browser> is the browser target, can be 'chrome-mv3', 'opera-mv3'
    ./build/dev/<browser>/filters
-
Manual conversion:
pnpm debug-filters:convert
# Under the hood:
pnpm exec tsurlfilter convert \
    # Enable extended logging about rulesets
    --debug \
    # Path to the directory with text filters
    # Where <browser> is the browser target, can be 'chrome-mv3', 'opera-mv3'
    ./build/dev/<browser>/filters \
    # Path to web-accessible-resources directory (needed for $redirect rules)
    # relative to the root directory of the extension (because they will be
    # loaded during runtime).
    /web-accessible-resources/redirects \
    # Destination path for converted DNR rulesets
    # Where <browser> is the browser target, can be 'chrome-mv3', 'opera-mv3'
    ./build/dev/<browser>/filters/declarative
-
Extract text filters from DNR rulesets:
pnpm debug-filters:extract
# Under the hood:
pnpm exec tsurlfilter extract-filters \
    # Path to the directory with DNR rulesets
    # Where <browser> is the browser target, can be 'chrome-mv3', 'opera-mv3'
    ./build/dev/<browser>/filters/declarative \
    # Path to save extracted text filters
    # Where <browser> is the browser target, can be 'chrome-mv3', 'opera-mv3'
    ./build/dev/<browser>/filters
For all command options, use --help, e.g.:
pnpm exec dnr-rulesets watch --help
pnpm exec tsurlfilter convert --helpThis guide explains how to update MV3 rulesets and submit them for Chrome Web Store fast-track review (skip review).
- Ensure you're on the branch you want to hotfix (beta or release)
- Have the necessary permissions to upload to Chrome Web Store
-
Navigate to the filters directory:
cd Extension/filters -
Extract text rules from DNR rulesets:
npx tsurlfilter extract-filters ./chromium-mv3/declarative ./extracted
Text rules are now located in the
./extractedfolder. -
Edit the text rules:
Open the extracted text files and make your necessary changes to fix the rules.
-
Convert text rules back to DNR rulesets:
npx tsurlfilter convert ./extracted /web-accessible-resources/redirects ./chromium-mv3/declarative --prettify-json=false
-
Exclude unsafe rules:
npx dnr-rulesets exclude-unsafe-rules ./chromium-mv3/declarative --prettify-json=false
-
Review changes:
Check
git difffor anything unusual to ensure everything is correct. Some differences like rule reordering are expected and acceptable. -
Return to project root and download the latest extension:
cd ../../For release version:
pnpm tsx tools/skip-review/download-latest-extension-mv3.ts release
For beta version:
pnpm tsx tools/skip-review/download-latest-extension-mv3.ts beta
-
Verify changes are acceptable for skip-review:
Make sure you're on the correct branch that is currently deployed as release/beta.
For release version:
pnpm tsx tools/skip-review/check-changes-for-cws.ts ./tmp/extension-release-latest ./build/release/chrome-mv3
For beta version:
pnpm tsx tools/skip-review/check-changes-for-cws.ts ./tmp/extension-beta-latest ./build/beta/chrome-mv3
-
Deploy:
- Run the manual Bamboo build
- Upload the extension to Chrome Web Store
- Submit for fast-track review
For detailed localization workflow and best practices, see Locales Documentation.
To download and append localizations run:
pnpm locales downloadTo upload new phrases to crowdin you need the file with phrases
./Extension/_locales/en/messages.json. Then run:
pnpm locales uploadTo remove old messages from locale messages run:
pnpm locales renewTo validate translations run:
pnpm locales validateTo show locales info run:
pnpm locales infoThe browser extension project includes a comprehensive bundle size monitoring system, located in tools/bundle-size. This system helps ensure that our extension bundles remain within defined size limits, and that any significant increases are reviewed and justified.
- Tracks and compares bundle sizes across different build types (
beta,release, etc.) and browser targets (chrome,chrome-mv3,edge, etc.) - Detects significant size increases using configurable thresholds (default: 10%)
- Ensures Chrome MV3 bundle stays under the 30MB limit
- Checks for duplicate package versions using
pnpm - Stores historical size data in
.bundle-sizes.json - Designed for CI/CD integration (Bamboo)
- For Firefox targets (AMO and Standalone) only, every individual
.jsfile is checked to ensure it does not exceed the 4MB limit imposed by the Firefox Add-ons Store. If any.jsfile is larger than 4MB, the check fails and the offending files are reported.
- On each beta or release build, the system compares the current bundle sizes to the reference values in
.bundle-sizes.json. - If any size exceeds the configured threshold, or additionally check for 30MB limit for Chrome MV3 target or 4MB limit for Firefox targets - the check fails.
- Duplicate package versions are detected and reported.
We have defined size limits in the project.
- When we build the
betaorreleaseversion, the build process checks if we're exceeding those limits. - If we exceed the limits, the developer should investigate the cause and decide whether the size increase is acceptable.
- If the new sizes are justified, the developer updates the size values in the package and creates a commit.
- We then review and approve any changes to the sizes as part of the PR process.
-
Run the build for the desired environment (e.g.,
pnpm betaorpnpm release). -
If the build fails due to bundle size limits, investigate the cause (e.g., new dependencies, large assets).
-
If the increase is justified, update the reference sizes by running:
pnpm update-bundle-size <buildEnv> [targetBrowser]
# Example: pnpm update-bundle-size release chrome-mv3
# Or: pnpm update-bundle-size beta firefox-amo
# Or: pnpm update-bundle-size dev
-
Commit the updated
.bundle-sizes.jsonfile and include justification in your PR. -
The changes will be reviewed and approved as part of the PR process.
To check bundle sizes locally, use:
pnpm check-bundle-size <buildEnv> [targetBrowser]
# Example: pnpm check-bundle-size release chrome-mv3
# Or: pnpm check-bundle-size beta firefox-amo
# Or: pnpm check-bundle-size dev
For CLI help on parameters, use:
pnpm check-bundle-size --help
pnpm update-bundle-size --helpYou can override the default threshold for significant bundle size increases using the --threshold option:
pnpm check-bundle-size <buildEnv> [targetBrowser] --threshold 5
# or
pnpm check-bundle-size release chrome-mv3 --threshold=20
# or
pnpm check-bundle-size beta
--threshold <number>: Sets the allowed percentage increase in bundle size before the check fails. Default: 10%.
This is useful for temporarily relaxing or tightening the allowed size delta for a specific check/build.
The background script (Extension/src/background/) follows a strict layered architecture. Each layer has a clear responsibility and dependency direction — upper layers depend on lower layers, never the reverse.
┌─────────────────────────────────────────────────────┐
│  app/              App entry point (init sequence)   │
├─────────────────────────────────────────────────────┤
│  services/         Event listeners, orchestration    │
├─────────────────────────────────────────────────────┤
│  api/              Business logic, public interface  │
├─────────────────────────────────────────────────────┤
│  engine/           tswebextension wrapper (MV2/MV3)  │
├─────────────────────────────────────────────────────┤
│  storages/         Data storage models               │
├─────────────────────────────────────────────────────┤
│  schema/           Zod validators and types          │
└─────────────────────────────────────────────────────┘
schema/— Zod validation schemas and TypeScript types for all persisted data (settings, filter state, metadata, etc.). This is the lowest layer — no dependencies on other background modules.storages/— Data storage models built on top of theschemalayer. Provides typed access tochrome.storage.local, IndexedDB, and in-memory caches.engine/— Wrapper around@adguard/tswebextension. Has MV2 and MV3 implementations (engine-mv2.ts,engine-mv3.ts) resolved at build time via path aliases. Manages the filtering engine lifecycle (start, update, configuration).api/— Business logic layer. Contains domain-specific APIs (filters, settings, allowlist, safebrowsing, UI, network, etc.) that read/write throughstoragesand control theengine.services/— Orchestration layer. Registers browser event listeners, wires together multiple APIs, and handles message-driven workflows (filter updates, settings sync, popup, filtering log, telemetry, etc.).app/— Application entry point.AppCommon(withAppMv2/AppMv3subclasses) initializes all layers in the correct order: storages → engine → APIs → services.
events/— Typed event handlers for context menu and settings changes.keep-alive/— Service worker / event page keep-alive mechanism (MV2/MV3 variants).prefs/— Runtime preferences (MV2/MV3 variants).tswebextension/— tswebextension configuration adapters (MV2/MV3 variants).errors/,utils/— Shared error types and utility functions.message-handler.ts— Routes messages from UI pages to the correct handler.connection-handler.ts— Manages long-livedRuntime.Portconnections.notifier.ts— Internal pub/sub event bus for cross-module notifications.
Extension/src/background/
├── app/                  # App entry point (AppCommon, AppMv2, AppMv3)
├── api/                  # Business logic APIs
│   ├── filters/          #   Filter management
│   ├── network/          #   Network requests
│   ├── settings/         #   Settings management
│   ├── ui/               #   UI-related APIs (icons, popups, pages)
│   └── ...               #   safebrowsing, install, update, etc.
├── services/             # Event listeners and orchestration
│   ├── filters/          #   Filter state management
│   ├── settings/         #   Settings event handling
│   ├── ui/               #   UI services (popup, promo notifications)
│   ├── telemetry/        #   Telemetry collection
│   └── ...               #   allowlist, userrules, custom-filters, etc.
├── engine/               # tswebextension wrapper (MV2/MV3)
├── storages/             # Data storage models
├── schema/               # Zod validators and types
├── events/               # Context menu and settings event handlers
├── keep-alive/           # Service worker keep-alive (MV2/MV3)
├── prefs/                # Runtime preferences (MV2/MV3)
├── tswebextension/       # tswebextension config adapters (MV2/MV3)
├── errors/               # Custom error types
├── utils/                # Shared utilities
├── connection-handler.ts # Long-lived port connections
├── content-script-injector.ts
├── message-handler.ts    # Message routing
├── notifier.ts           # Internal pub/sub event bus
└── index.ts              # Background script entry point
The project uses TypeScript Project References to completely separate Manifest V2 and V3 codebases into independent TypeScript projects. This architectural approach eliminates the need for empty stub implementations and provides superior IDE support.
The project contains 5 TypeScript configuration files, each serving a specific purpose:
-
tsconfig.base.json- Shared base configuration- Common compiler options for all projects
- JSX support and module resolution settings
-
tsconfig.json- Root project references container- Contains minimal includes
- References both MV2 and MV3 projects
- Enables VS Code to automatically switch between projects
-
tsconfig.mv2.json- Manifest V2 project- Excludes all
**/*-mv3.tsand**/*-mv3.tsxfiles - Contains MV2-specific path aliases
- Composite project with declaration output
- Excludes all
-
tsconfig.mv3.json- Manifest V3 project- Excludes all
**/*-mv2.tsand**/*-mv2.tsxfiles - Contains MV3-specific path aliases
- Composite project with declaration output
- Excludes all
-
tsconfig.eslint.json- ESLint-specific configuration- Includes all files for linting purposes
- Special path mapping for JSX files
- Separate from compilation projects
The project uses two CSS layers to manage style priority:
components- Component-specific styles (buttons, modals, etc.)utilities- Utility classes with higher priority (e.g.,.hideOnMobile)
Layer order is declared inline in HTML templates (e.g., Extension/pages/options/index.html):
This ensures the layer order is established before any style-loader injections from JavaScript bundles. The utilities layer has higher priority than components, ensuring utility classes always override component styles.
Optional environment variables are configured via a .env file (copy from .env.example):
| Variable | Description |
|---|---|
ARTIFACTORY_DOMAIN |
Artifactory domain for downloading blocking pages |
OPENAI_API_KEY |
OpenAI API key for detecting dangerous script rules during pnpm resources |
ANALYZE |
Set to true to generate bundle analysis reports during builds |
The project has retry settings in .npmrc. If you still have issues, check your network/VPN configuration and try again.
You cannot import directly from -mv2 or -mv3 suffixed files in common code. Use TypeScript path aliases defined in tsconfig.mv2.json / tsconfig.mv3.json instead. See AGENTS.md for import rules.
The project uses TypeScript Project References with separate configs for MV2 and MV3. Make sure your IDE is using the correct tsconfig.json (the root one references both). Run pnpm lint:types:mv2 and pnpm lint:types:mv3 separately to isolate the issue.
If the pre-commit hook is interrupted, lint-staged may leave a temporary section in package.json. Remove it manually from the diff before committing.
Use the --no-cache flag when running watch mode with linked packages:
pnpm dev <browser> --watch --no-cacheInvestigate the cause of the size increase. If justified, update reference sizes with pnpm update-bundle-size <env> [browser] and include justification in your PR.
- AGENTS.md — Code guidelines, conventions, and review checklist
- README.md — Project overview and installation instructions
- CHANGELOG.md — Version history
- Locales Documentation — Localization workflow
- Dangerous Rules Documentation — Dangerous rules detection
- tsurlfilter — Filtering engine library